The Quick Flick
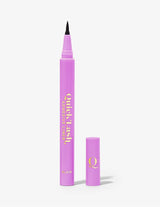
The Quick Flick Quick Lash 2 in 1 Adhesive Liner - Black
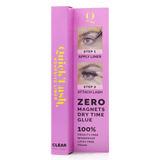
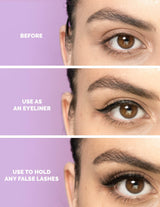
The no fuss approach to a dual purpose adhesive liner. No glue and no magnets means this gem can be used as a lash adhesive, as a liner, or as both!
Give irritating lash glues and magnets the flick!
Quick lash's precision felt tip liner makes it easy to draw a thin layer of adhesive onto the lash line with zero fuss, glues or magnets.
The non-latex formula is re-stickable, making readjustment easy.
Use quick lash adhesive liner with false lashes of your choice for fabulous, windproof lashes in a flash.
Quick lash is 100% Vegan and Cruelty-free.
Zero glue, zero magnets: Our adhesive liner is formulated without toxic glues or magnets that can irritate the sensitive eye area.
Plus, there's no long drying time so you can get back to doing what you love faster.
Directions:
Step 1. Shake product well before use.
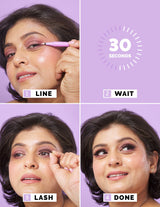
Step 2. Apply a generous amount of formula along the lash line of your eye. We recommend 2-3 swipes. Ensure you take the liner all the way along your lash line to ensure the edge of your lash band sits firmly. You may also apply additional adhesive to the actual lash band itself for extra hold. Ensure you cover the tips of your lash band also.
Step 3. Ensure your eye area is clean and oil free. Products like eye creams and face oils can hinder the effect of quick lash. Allow 30 seconds for the liner adhesive to be absorbed into the skin properly before attaching your lash. Apply once liner feels tacky.
Step 4. Upon application, ensure you are pressing your lash band into place. As quick lash is a pressure sensitive adhesive, it does require a soft-medium pressure to be activated. Please remember quick lash is not like a magnetic eyeliner that bonds instantly, it does require pressure in order to work.
Step 5. We also recommend you ensure your lashes are trimmed to size. Lashes that are too large will lift up easily. Ensure you trim your lashes from the outside of the band, if lashes are trimmed from the inside, the curve of the band will be compromised which may cause lifting or discomfort.
;
Step 1. Shake product well before use.
Step 2. Apply a generous amount of formula along the lash line of your eye. We recommend 2-3 swipes. Ensure you take the liner all the way along your lash line to ensure the edge of your lash band sits firmly. You may also apply additional adhesive to the actual lash band itself for extra hold. Ensure you cover the tips of your lash band also.
Step 3. Ensure your eye area is clean and oil free. Products like eye creams and face oils can hinder the effect of quick lash. Allow 30 seconds for the liner adhesive to be absorbed into the skin properly before attaching your lash. Apply once liner feels tacky.
Step 4. Upon application, ensure you are pressing your lash band into place. As quick lash is a pressure sensitive adhesive, it does require a soft-medium pressure to be activated. Please remember quick lash is not like a magnetic eyeliner that bonds instantly, it does require pressure in order to work.
Step 5. We also recommend you ensure your lashes are trimmed to size. Lashes that are too large will lift up easily. Ensure you trim your lashes from the outside of the band, if lashes are trimmed from the inside, the curve of the band will be compromised which may cause lifting or discomfort.
Warnings:
All reasonable efforts have been made to ensure that ingredient listings, product images and other information for products displayed on this website are up to date, accurate and complete.
However, we still recommend that you please check the ingredient listings on a product before use.
Always read the label and use as directed
Buy Now Pay Later Options available:
Pay with Bitcoin, Solana, USDC


