Youthphoria Beauty
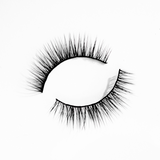
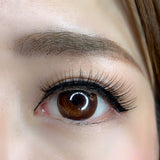
Youthphoria Beauty Luxe Faux Mink Lashes - Jasmine
An exclusive world first 6 micro-magnet lash! Jasmine is perfect for enhancing your natural best, without being too extra.
A delicate and understated classic lash look that's Simple and modest.
Universally suits all eyes shapes.
Exquisitely hand-made for quality and durability.
Designed in Australia,
Directions:
Step 1: try on the magnetic eyelashes-try on the lashes to check its fit, and trim if needed.
- The magnetic lashes should run across your upper lash line along your eyelid. Remember to ensure magnets are at the very end of the inner and outer sides of the lashes. This will help the lashes grip-meaning a more natural, comfortable look for you!
Step 2: apply your magnetic eyeliner-ensure your eyelids are clean and dry. Shake the bottle and then, apply a thick and even line of the magnetic liner on your natural lash line above your eyelids.
While the liner is magnetic, you can also use as normal liner-just make sure you line the inner and outer corner of your lash line to ensure maximum grip.
Let the liner dry for approximately 10 seconds and until the eyeliner is slightly tacky (about 80% dry).
Tip: apply two coats for extra strength. A thin line of magnetic eyeliner can be achieved by scraping the brush-tip against the inside of the eyeliner container.
Step 3: magnetise your lashes onto the magnetic eyeliner
Using your fingers, place the magnetic lashes on top of the liner you applied in step 2. Begin applying the lash from the inner corner to the outer corner of your lash line.
This will allow the magnets to softly snap into place, one by one. Press the lashes into place. Firmly press the lashes onto the liner to ensure a secure attachment.
And voila! You're done! Precautions: as with any cosmetic product, always perform a patch test prior to full application. In case of eye contact, wash the eye thoroughly with clean water.
If you have a pre-existing eye condition consult a medical professional before use.
;
Step 1: try on the magnetic eyelashes-try on the lashes to check its fit, and trim if needed.
- The magnetic lashes should run across your upper lash line along your eyelid. Remember to ensure magnets are at the very end of the inner and outer sides of the lashes. This will help the lashes grip-meaning a more natural, comfortable look for you!
Step 2: apply your magnetic eyeliner-ensure your eyelids are clean and dry. Shake the bottle and then, apply a thick and even line of the magnetic liner on your natural lash line above your eyelids.
While the liner is magnetic, you can also use as normal liner-just make sure you line the inner and outer corner of your lash line to ensure maximum grip.
Let the liner dry for approximately 10 seconds and until the eyeliner is slightly tacky (about 80% dry).
Tip: apply two coats for extra strength. A thin line of magnetic eyeliner can be achieved by scraping the brush-tip against the inside of the eyeliner container.
Step 3: magnetise your lashes onto the magnetic eyeliner
Using your fingers, place the magnetic lashes on top of the liner you applied in step 2. Begin applying the lash from the inner corner to the outer corner of your lash line.
This will allow the magnets to softly snap into place, one by one. Press the lashes into place. Firmly press the lashes onto the liner to ensure a secure attachment.
And voila! You're done! Precautions: as with any cosmetic product, always perform a patch test prior to full application. In case of eye contact, wash the eye thoroughly with clean water.
If you have a pre-existing eye condition consult a medical professional before use.
Warnings:
When you're ready to remove your lashes, peel off the magnetic lashes with your fingers.
You can remove the magnetic eyeliner with normal makeup remover.
If there are remnants of the liner on your magnetic lashes, you can clean them by gently rubbing them with a cotton bud dipped in makeup remover or removing them carefully with tweezers.
Don't forget to store your lashes in its case! This will keep them safe, and help them keep their shape-so you're ready for perfection, use after use.
When properly cared for, your Youthphoria magnetic lashes are reusable up to 60 times.
Tip: To increase the longevity of your Youthphoria magnetic eyelashes further, don't apply mascara directly to them.
You can apply mascara to your natural lashes first, allow it to dry, then apply your Youthphoria lashes.
As with any cosmetic product, always perform a patch test prior to full application.
In case of eye contact, wash the eye thoroughly with clean water.
If you have a pre-existing eye condition consult a medical professional before use.
Do not use in MRI scans
Buy Now Pay Later Options available:
Pay with Bitcoin, Solana, USDC


