


Theragun
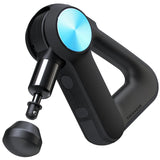
Theragun PRO Hand-held Percussive Therapy Massager - Black
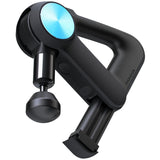
The deep muscle treatment pros trust with the durability and features they rely on. Enhance muscle recovery, release stress and tension, and soothe discomfort with the smart percussive therapy device in a league of its own.
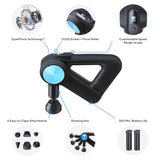
Featuring a commercial-grade QX150 brushless motor, the Theragun PRO Hand-held Percussive Therapy Massager offers powerful performance to relieve muscle strain. Plus, with QuietForce technology, it delivers near-silent operation.
This percussive therapy massager offers 5 scientifically calibrated speed options from 1750, 1900, 2100, 2200, and 2400ppms to adapt to your needs. For added convenience, it has an OLED screen which displays your current speed and responsive force meter for optimum monitoring.
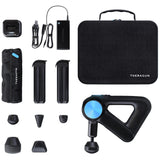
For a comprehensive therapeutic experience, the PRO Hand-held Percussive Massager comes with 6 attachments, including the Supersoft, Dampener, Standard Ball, Wedge, Thumb, and Cone, as well as a protective carrying case.
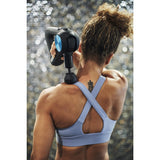
Convenient and comfortable to use, the Theragun PRO Percussive Massager offers 4 unique arm positions to reach any areas of your body. Plus, its Theragun Triangle ergonomic handle design helps reduce strain on your hands, wrists, and arms during use.
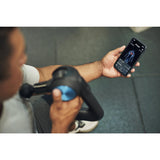
Use the Theragun PRO together with the Therabody app (download required) for guided and personalised wellness routines based on gathered data, including your real-time activity and behaviors. It also seamlessly integrates with Apple Health, Google Fit, and Samsung Health to further optimise its suggestions.
Directions:
Using the PRO:
- Insert the lithium-ion battery fully before turning on the PRO.
- To turn on the PRO, firmly press and hold the center button for 2 seconds on the button pad.
- Press the plus (+) and minus (-) buttons on the button pad to increase or decrease speed.
- Press the left (<) and right (>) arrows on the button pad to toggle between the PRO's pre-loaded treatment presets.
- The PRO should be used with the attachment making perpendicular contact with the skin. Only the attachment of the device should make contact with the skin or area you are treating. Do not use the device at an angle that puts the percussive arm of the device in contact with the skin.
- To turn off the PRO, firmly press and hold the center button on the button pad until the device shuts down.
Connecting the Attachments:
Align the attachment with the tip of the rotating arm and push to connect. To remove, grip the attachment, placing 1 finger on each side of the plastic connector. Pull off the attachment.
Using the Rotating Arm:
The PRO's rotating arm adjusts to 4 positions. To adjust the arm, push the rotating arm button on the underside of the PRO and move the arm to the desired position.
Inserting and Removing PRO's Lithium-ion Batteries:
Align and insert the battery in the battery slot on the underside of the Theragun PRO with the flat side of the battery end facing the circular release button. Battery life is displayed on the PRO's OLED screen when the device is turned on. The PRO is fully charged when the OLED screen shows 100% and the battery icon is full. To remove the battery, press the circular release button above the battery slot and pull the battery out.
Charging:
Plug the charging wire into the port on the charging dock. Insert the battery into the charging dock and press down until the light flashes. Charging is complete once the light stops flashing.
;
Using the PRO:
- Insert the lithium-ion battery fully before turning on the PRO.
- To turn on the PRO, firmly press and hold the center button for 2 seconds on the button pad.
- Press the plus (+) and minus (-) buttons on the button pad to increase or decrease speed.
- Press the left (<) and right (>) arrows on the button pad to toggle between the PRO's pre-loaded treatment presets.
- The PRO should be used with the attachment making perpendicular contact with the skin. Only the attachment of the device should make contact with the skin or area you are treating. Do not use the device at an angle that puts the percussive arm of the device in contact with the skin.
- To turn off the PRO, firmly press and hold the center button on the button pad until the device shuts down.
Connecting the Attachments:
Align the attachment with the tip of the rotating arm and push to connect. To remove, grip the attachment, placing 1 finger on each side of the plastic connector. Pull off the attachment.
Using the Rotating Arm:
The PRO's rotating arm adjusts to 4 positions. To adjust the arm, push the rotating arm button on the underside of the PRO and move the arm to the desired position.
Inserting and Removing PRO's Lithium-ion Batteries:
Align and insert the battery in the battery slot on the underside of the Theragun PRO with the flat side of the battery end facing the circular release button. Battery life is displayed on the PRO's OLED screen when the device is turned on. The PRO is fully charged when the OLED screen shows 100% and the battery icon is full. To remove the battery, press the circular release button above the battery slot and pull the battery out.
Charging:
Plug the charging wire into the port on the charging dock. Insert the battery into the charging dock and press down until the light flashes. Charging is complete once the light stops flashing.
Warnings:
Box Contains:
1x Theragun PRO 1x Protective Carrying Case 6x Attachments (Supersoft, Dampener, Standard Ball, Wedge, Thumb & Cone) 1x Travel Pouch for attachment 2x Lithium-ion Batteries 1x Lithium-ion Battery Charger


Theragun
Theragun PRO Hand-held Percussive Therapy Massager - Black
The deep muscle treatment pros trust with the durability and features they rely on. Enhance muscle recovery, release stress and tension, and soothe discomfort with the smart percussive therapy device in a league of its own.
Featuring a commercial-grade QX150 brushless motor, the Theragun PRO Hand-held Percussive Therapy Massager offers powerful performance to relieve muscle strain. Plus, with QuietForce technology, it delivers near-silent operation.
This percussive therapy massager offers 5 scientifically calibrated speed options from 1750, 1900, 2100, 2200, and 2400ppms to adapt to your needs. For added convenience, it has an OLED screen which displays your current speed and responsive force meter for optimum monitoring.
For a comprehensive therapeutic experience, the PRO Hand-held Percussive Massager comes with 6 attachments, including the Supersoft, Dampener, Standard Ball, Wedge, Thumb, and Cone, as well as a protective carrying case.
Convenient and comfortable to use, the Theragun PRO Percussive Massager offers 4 unique arm positions to reach any areas of your body. Plus, its Theragun Triangle ergonomic handle design helps reduce strain on your hands, wrists, and arms during use.
Use the Theragun PRO together with the Therabody app (download required) for guided and personalised wellness routines based on gathered data, including your real-time activity and behaviors. It also seamlessly integrates with Apple Health, Google Fit, and Samsung Health to further optimise its suggestions.
Directions:
Using the PRO:
- Insert the lithium-ion battery fully before turning on the PRO.
- To turn on the PRO, firmly press and hold the center button for 2 seconds on the button pad.
- Press the plus (+) and minus (-) buttons on the button pad to increase or decrease speed.
- Press the left (<) and right (>) arrows on the button pad to toggle between the PRO's pre-loaded treatment presets.
- The PRO should be used with the attachment making perpendicular contact with the skin. Only the attachment of the device should make contact with the skin or area you are treating. Do not use the device at an angle that puts the percussive arm of the device in contact with the skin.
- To turn off the PRO, firmly press and hold the center button on the button pad until the device shuts down.
Connecting the Attachments:
Align the attachment with the tip of the rotating arm and push to connect. To remove, grip the attachment, placing 1 finger on each side of the plastic connector. Pull off the attachment.
Using the Rotating Arm:
The PRO's rotating arm adjusts to 4 positions. To adjust the arm, push the rotating arm button on the underside of the PRO and move the arm to the desired position.
Inserting and Removing PRO's Lithium-ion Batteries:
Align and insert the battery in the battery slot on the underside of the Theragun PRO with the flat side of the battery end facing the circular release button. Battery life is displayed on the PRO's OLED screen when the device is turned on. The PRO is fully charged when the OLED screen shows 100% and the battery icon is full. To remove the battery, press the circular release button above the battery slot and pull the battery out.
Charging:
Plug the charging wire into the port on the charging dock. Insert the battery into the charging dock and press down until the light flashes. Charging is complete once the light stops flashing.
;
Using the PRO:
- Insert the lithium-ion battery fully before turning on the PRO.
- To turn on the PRO, firmly press and hold the center button for 2 seconds on the button pad.
- Press the plus (+) and minus (-) buttons on the button pad to increase or decrease speed.
- Press the left (<) and right (>) arrows on the button pad to toggle between the PRO's pre-loaded treatment presets.
- The PRO should be used with the attachment making perpendicular contact with the skin. Only the attachment of the device should make contact with the skin or area you are treating. Do not use the device at an angle that puts the percussive arm of the device in contact with the skin.
- To turn off the PRO, firmly press and hold the center button on the button pad until the device shuts down.
Connecting the Attachments:
Align the attachment with the tip of the rotating arm and push to connect. To remove, grip the attachment, placing 1 finger on each side of the plastic connector. Pull off the attachment.
Using the Rotating Arm:
The PRO's rotating arm adjusts to 4 positions. To adjust the arm, push the rotating arm button on the underside of the PRO and move the arm to the desired position.
Inserting and Removing PRO's Lithium-ion Batteries:
Align and insert the battery in the battery slot on the underside of the Theragun PRO with the flat side of the battery end facing the circular release button. Battery life is displayed on the PRO's OLED screen when the device is turned on. The PRO is fully charged when the OLED screen shows 100% and the battery icon is full. To remove the battery, press the circular release button above the battery slot and pull the battery out.
Charging:
Plug the charging wire into the port on the charging dock. Insert the battery into the charging dock and press down until the light flashes. Charging is complete once the light stops flashing.
;
Using the PRO:
- Insert the lithium-ion battery fully before turning on the PRO.
- To turn on the PRO, firmly press and hold the center button for 2 seconds on the button pad.
- Press the plus (+) and minus (-) buttons on the button pad to increase or decrease speed.
- Press the left (<) and right (>) arrows on the button pad to toggle between the PRO's pre-loaded treatment presets.
- The PRO should be used with the attachment making perpendicular contact with the skin. Only the attachment of the device should make contact with the skin or area you are treating. Do not use the device at an angle that puts the percussive arm of the device in contact with the skin.
- To turn off the PRO, firmly press and hold the center button on the button pad until the device shuts down.
Connecting the Attachments:
Align the attachment with the tip of the rotating arm and push to connect. To remove, grip the attachment, placing 1 finger on each side of the plastic connector. Pull off the attachment.
Using the Rotating Arm:
The PRO's rotating arm adjusts to 4 positions. To adjust the arm, push the rotating arm button on the underside of the PRO and move the arm to the desired position.
Inserting and Removing PRO's Lithium-ion Batteries:
Align and insert the battery in the battery slot on the underside of the Theragun PRO with the flat side of the battery end facing the circular release button. Battery life is displayed on the PRO's OLED screen when the device is turned on. The PRO is fully charged when the OLED screen shows 100% and the battery icon is full. To remove the battery, press the circular release button above the battery slot and pull the battery out.
Charging:
Plug the charging wire into the port on the charging dock. Insert the battery into the charging dock and press down until the light flashes. Charging is complete once the light stops flashing.
;
Using the PRO:
- Insert the lithium-ion battery fully before turning on the PRO.
- To turn on the PRO, firmly press and hold the center button for 2 seconds on the button pad.
- Press the plus (+) and minus (-) buttons on the button pad to increase or decrease speed.
- Press the left (<) and right (>) arrows on the button pad to toggle between the PRO's pre-loaded treatment presets.
- The PRO should be used with the attachment making perpendicular contact with the skin. Only the attachment of the device should make contact with the skin or area you are treating. Do not use the device at an angle that puts the percussive arm of the device in contact with the skin.
- To turn off the PRO, firmly press and hold the center button on the button pad until the device shuts down.
Connecting the Attachments:
Align the attachment with the tip of the rotating arm and push to connect. To remove, grip the attachment, placing 1 finger on each side of the plastic connector. Pull off the attachment.
Using the Rotating Arm:
The PRO's rotating arm adjusts to 4 positions. To adjust the arm, push the rotating arm button on the underside of the PRO and move the arm to the desired position.
Inserting and Removing PRO's Lithium-ion Batteries:
Align and insert the battery in the battery slot on the underside of the Theragun PRO with the flat side of the battery end facing the circular release button. Battery life is displayed on the PRO's OLED screen when the device is turned on. The PRO is fully charged when the OLED screen shows 100% and the battery icon is full. To remove the battery, press the circular release button above the battery slot and pull the battery out.
Charging:
Plug the charging wire into the port on the charging dock. Insert the battery into the charging dock and press down until the light flashes. Charging is complete once the light stops flashing.
;
Using the PRO:
- Insert the lithium-ion battery fully before turning on the PRO.
- To turn on the PRO, firmly press and hold the center button for 2 seconds on the button pad.
- Press the plus (+) and minus (-) buttons on the button pad to increase or decrease speed.
- Press the left (<) and right (>) arrows on the button pad to toggle between the PRO's pre-loaded treatment presets.
- The PRO should be used with the attachment making perpendicular contact with the skin. Only the attachment of the device should make contact with the skin or area you are treating. Do not use the device at an angle that puts the percussive arm of the device in contact with the skin.
- To turn off the PRO, firmly press and hold the center button on the button pad until the device shuts down.
Connecting the Attachments:
Align the attachment with the tip of the rotating arm and push to connect. To remove, grip the attachment, placing 1 finger on each side of the plastic connector. Pull off the attachment.
Using the Rotating Arm:
The PRO's rotating arm adjusts to 4 positions. To adjust the arm, push the rotating arm button on the underside of the PRO and move the arm to the desired position.
Inserting and Removing PRO's Lithium-ion Batteries:
Align and insert the battery in the battery slot on the underside of the Theragun PRO with the flat side of the battery end facing the circular release button. Battery life is displayed on the PRO's OLED screen when the device is turned on. The PRO is fully charged when the OLED screen shows 100% and the battery icon is full. To remove the battery, press the circular release button above the battery slot and pull the battery out.
Charging:
Plug the charging wire into the port on the charging dock. Insert the battery into the charging dock and press down until the light flashes. Charging is complete once the light stops flashing.
;
Using the PRO:
- Insert the lithium-ion battery fully before turning on the PRO.
- To turn on the PRO, firmly press and hold the center button for 2 seconds on the button pad.
- Press the plus (+) and minus (-) buttons on the button pad to increase or decrease speed.
- Press the left (<) and right (>) arrows on the button pad to toggle between the PRO's pre-loaded treatment presets.
- The PRO should be used with the attachment making perpendicular contact with the skin. Only the attachment of the device should make contact with the skin or area you are treating. Do not use the device at an angle that puts the percussive arm of the device in contact with the skin.
- To turn off the PRO, firmly press and hold the center button on the button pad until the device shuts down.
Connecting the Attachments:
Align the attachment with the tip of the rotating arm and push to connect. To remove, grip the attachment, placing 1 finger on each side of the plastic connector. Pull off the attachment.
Using the Rotating Arm:
The PRO's rotating arm adjusts to 4 positions. To adjust the arm, push the rotating arm button on the underside of the PRO and move the arm to the desired position.
Inserting and Removing PRO's Lithium-ion Batteries:
Align and insert the battery in the battery slot on the underside of the Theragun PRO with the flat side of the battery end facing the circular release button. Battery life is displayed on the PRO's OLED screen when the device is turned on. The PRO is fully charged when the OLED screen shows 100% and the battery icon is full. To remove the battery, press the circular release button above the battery slot and pull the battery out.
Charging:
Plug the charging wire into the port on the charging dock. Insert the battery into the charging dock and press down until the light flashes. Charging is complete once the light stops flashing.
;
Using the PRO:
- Insert the lithium-ion battery fully before turning on the PRO.
- To turn on the PRO, firmly press and hold the center button for 2 seconds on the button pad.
- Press the plus (+) and minus (-) buttons on the button pad to increase or decrease speed.
- Press the left (<) and right (>) arrows on the button pad to toggle between the PRO's pre-loaded treatment presets.
- The PRO should be used with the attachment making perpendicular contact with the skin. Only the attachment of the device should make contact with the skin or area you are treating. Do not use the device at an angle that puts the percussive arm of the device in contact with the skin.
- To turn off the PRO, firmly press and hold the center button on the button pad until the device shuts down.
Connecting the Attachments:
Align the attachment with the tip of the rotating arm and push to connect. To remove, grip the attachment, placing 1 finger on each side of the plastic connector. Pull off the attachment.
Using the Rotating Arm:
The PRO's rotating arm adjusts to 4 positions. To adjust the arm, push the rotating arm button on the underside of the PRO and move the arm to the desired position.
Inserting and Removing PRO's Lithium-ion Batteries:
Align and insert the battery in the battery slot on the underside of the Theragun PRO with the flat side of the battery end facing the circular release button. Battery life is displayed on the PRO's OLED screen when the device is turned on. The PRO is fully charged when the OLED screen shows 100% and the battery icon is full. To remove the battery, press the circular release button above the battery slot and pull the battery out.
Charging:
Plug the charging wire into the port on the charging dock. Insert the battery into the charging dock and press down until the light flashes. Charging is complete once the light stops flashing.
;
Using the PRO:
- Insert the lithium-ion battery fully before turning on the PRO.
- To turn on the PRO, firmly press and hold the center button for 2 seconds on the button pad.
- Press the plus (+) and minus (-) buttons on the button pad to increase or decrease speed.
- Press the left (<) and right (>) arrows on the button pad to toggle between the PRO's pre-loaded treatment presets.
- The PRO should be used with the attachment making perpendicular contact with the skin. Only the attachment of the device should make contact with the skin or area you are treating. Do not use the device at an angle that puts the percussive arm of the device in contact with the skin.
- To turn off the PRO, firmly press and hold the center button on the button pad until the device shuts down.
Connecting the Attachments:
Align the attachment with the tip of the rotating arm and push to connect. To remove, grip the attachment, placing 1 finger on each side of the plastic connector. Pull off the attachment.
Using the Rotating Arm:
The PRO's rotating arm adjusts to 4 positions. To adjust the arm, push the rotating arm button on the underside of the PRO and move the arm to the desired position.
Inserting and Removing PRO's Lithium-ion Batteries:
Align and insert the battery in the battery slot on the underside of the Theragun PRO with the flat side of the battery end facing the circular release button. Battery life is displayed on the PRO's OLED screen when the device is turned on. The PRO is fully charged when the OLED screen shows 100% and the battery icon is full. To remove the battery, press the circular release button above the battery slot and pull the battery out.
Charging:
Plug the charging wire into the port on the charging dock. Insert the battery into the charging dock and press down until the light flashes. Charging is complete once the light stops flashing.
;
Using the PRO:
- Insert the lithium-ion battery fully before turning on the PRO.
- To turn on the PRO, firmly press and hold the center button for 2 seconds on the button pad.
- Press the plus (+) and minus (-) buttons on the button pad to increase or decrease speed.
- Press the left (<) and right (>) arrows on the button pad to toggle between the PRO's pre-loaded treatment presets.
- The PRO should be used with the attachment making perpendicular contact with the skin. Only the attachment of the device should make contact with the skin or area you are treating. Do not use the device at an angle that puts the percussive arm of the device in contact with the skin.
- To turn off the PRO, firmly press and hold the center button on the button pad until the device shuts down.
Connecting the Attachments:
Align the attachment with the tip of the rotating arm and push to connect. To remove, grip the attachment, placing 1 finger on each side of the plastic connector. Pull off the attachment.
Using the Rotating Arm:
The PRO's rotating arm adjusts to 4 positions. To adjust the arm, push the rotating arm button on the underside of the PRO and move the arm to the desired position.
Inserting and Removing PRO's Lithium-ion Batteries:
Align and insert the battery in the battery slot on the underside of the Theragun PRO with the flat side of the battery end facing the circular release button. Battery life is displayed on the PRO's OLED screen when the device is turned on. The PRO is fully charged when the OLED screen shows 100% and the battery icon is full. To remove the battery, press the circular release button above the battery slot and pull the battery out.
Charging:
Plug the charging wire into the port on the charging dock. Insert the battery into the charging dock and press down until the light flashes. Charging is complete once the light stops flashing.
;
Using the PRO:
- Insert the lithium-ion battery fully before turning on the PRO.
- To turn on the PRO, firmly press and hold the center button for 2 seconds on the button pad.
- Press the plus (+) and minus (-) buttons on the button pad to increase or decrease speed.
- Press the left (<) and right (>) arrows on the button pad to toggle between the PRO's pre-loaded treatment presets.
- The PRO should be used with the attachment making perpendicular contact with the skin. Only the attachment of the device should make contact with the skin or area you are treating. Do not use the device at an angle that puts the percussive arm of the device in contact with the skin.
- To turn off the PRO, firmly press and hold the center button on the button pad until the device shuts down.
Connecting the Attachments:
Align the attachment with the tip of the rotating arm and push to connect. To remove, grip the attachment, placing 1 finger on each side of the plastic connector. Pull off the attachment.
Using the Rotating Arm:
The PRO's rotating arm adjusts to 4 positions. To adjust the arm, push the rotating arm button on the underside of the PRO and move the arm to the desired position.
Inserting and Removing PRO's Lithium-ion Batteries:
Align and insert the battery in the battery slot on the underside of the Theragun PRO with the flat side of the battery end facing the circular release button. Battery life is displayed on the PRO's OLED screen when the device is turned on. The PRO is fully charged when the OLED screen shows 100% and the battery icon is full. To remove the battery, press the circular release button above the battery slot and pull the battery out.
Charging:
Plug the charging wire into the port on the charging dock. Insert the battery into the charging dock and press down until the light flashes. Charging is complete once the light stops flashing.
Warnings:
Box Contains:
1x Theragun PRO 1x Protective Carrying Case 6x Attachments (Supersoft, Dampener, Standard Ball, Wedge, Thumb & Cone) 1x Travel Pouch for attachment 2x Lithium-ion Batteries 1x Lithium-ion Battery Charger
Buy Now Pay Later Options available:
Pay with Bitcoin, Solana, USDC


